How To Create a Website (Step by Step Guide for Beginners)
Building a website has only become easier over the past 10-20 years. Thanks to the emergence of platforms like Wix, WordPress, and Weebly, you don’t have to be a coding guru to build a website. They are perfect tools for anyone who doesn’t have coding skills, wants to focus on content marketing and strategy, sell products and services online, or simply values all-in-one convenience. Regardless of the reason for creating a site, it’s important that you think about what you want to achieve with it before getting started. Competitor research can help you get an idea of what’s best for your business. In this post, we provide a step-by-step guide on how to create a website. It is specially tailored to beginners.
What type of website do you need?
There are many types of websites, and you can choose one depending on the functionality and objective you want to achieve.
Blog or website with a blog:
You can create a blog independently, or as an extra feature for your website. Blog posts are usually arranged in a chronological order, with the most recent ones appearing first.
Portfolio site:
It is a simple one-page website the name, contact information, address and maybe product/service information. The most important feature of a portfolio site is a section where users get to showcase their work while offering options for contact. Website design firms, fashion designers, makeup artists, and photographers are just a few of the professionals who need this type of website.
E-commerce site:

This allows businesses to showcase their products/services and visitors to make purchases.
Business card site:

This is similar to the portfolio site but doesn’t have to showcase work samples. It is usually a one-page website with the business name, contact information, address and product/service information.
Product brochure site:
It serves as an extension to your sales and marketing efforts. It allows you to include offers for customers to browse through. While it may provide pricing guidelines, this type of site doesn’t allow visitors to make purchases.
How to Create a Website in 6 Steps
1. Choose a Website Builder:

You need a good platform if you want to build a functional and mobile website quickly, and there are plenty of options. It’s important to make the right decision because moving a site to another hosting provider is never easy. You can opt for either web-hosted website builder platforms or self-hosted content management systems.
According to a recent report published by W3Techs, WordPress is the most popular website builder, followed closely by Joomla and Drupal. Statistics aside, you need a platform that is beginner-friendly. Something that requires learning HTML may not be a viable option depending on how soon you want to launch your site.
Many builders offer a drag-and-drop interface, which is handy for those with zero coding skills. You can always advantage of the free trial offer and try out the features before making a final decision.
In addition to features, you need to consider the growth options. For instance, do you need a blog? How often do you plan on updating the site? Will you use the site to sell products and services in the future? The website builder you choose should be capable of accommodating the changing needs of your business.
Other factors to consider include;
Value for money:
It should offer a good balance between features and pricing. No one wants to burn a hole through their pockets, but cheap can be expensive.
Help and support:
Take into account how strong a builder’s support is. Look for a knowledge center, live chat, toll-free telephone number, and email.
Design flexibility:
The template selections should be aesthetically appealing, industry appealing and user-friendly. They should also work well on mobile devices.
2. Get a Domain Name and Hosting Provider:

The domain name is usually in the form of yourname.com, yourbusinessname.com, businessname.org or something similar. If you are marketing yourself, a domain name with your first and last name is best. Think yourbusiness.com if you are marketing your business. For most people, choosing a top-level .com domain in their niche is the priority. Other common domain name extensions include .org, .net, .gov, .edu and .int. Many countries code top-level domain extensions and generic top-level extensions are also available.
Whatever domain name you decide to use, make sure it is;
- Easy to type
- A .com since it is the most popular and easiest to remember
- Brandable
- Short
- Doesn’t violate any trademarks
- It shouldn’t have any numbers or letters
Once you have chosen a domain name, the next logical step is to select a reliable hosting service. Your choice will largely determine your website’s performance and functionality. Many internet service providers offer web hosting services and multiple email addresses. The cost of hosting depends on how big your site is and the number of visitors.
Once you’ve chosen a hosting provider, you’ll need to set up your account. In addition to contact information, username and password, you may be required to choose a package and provide credit card details.
Read Also: Top 10 Best Domain Registrars in 2018
3. Set up WordPress:
Now that you set up an account with hosting provider and have a domain name, the next step is to set up WordPress. Some hosting providers allow for one-click WordPress installation while others don’t. Either way, the first thing to do is choose a WordPress theme. If you don’t like the ones offered by your web hosting provider, you can always find more at the WordPress Theme Repository or purchase premium themes.
There are two WordPress zones i.e. frontend and backend. You perform most of the actions including theme customization and content publication from the backend, and your visitors see the frontend. The backend is also known as the WordPress dashboard. It gives you full control over the functionality, design, community, and content of your site.
The WordPress dashboard has three main areas i.e. top toolbar, middle section, and the left-side menu. The latter is where you focus most creative efforts, and access to multiple commands and admin options. These include plugins, settings, pages, media, updates, appearance and comments.

4. Design and customize your Website:
Designing your site is crucial because people will base opinions about your business on the overall look. Your design should make an impact on the visitors – the kind that makes them want to browse your site. Simply choosing a theme is not enough. There are many customization options depending on the type of site you’re looking to build. Key factors to consider when designing your website include;
- Easy navigation
- Clean design
- Brand’s niche and objectives
- Unique design elements
- Optimization for mobile devices
There are multiple things that go into customizing a theme or template like adding new pages, contact forms & images, choosing a color palette, changing fonts, choosing the size, color, and fonts of buttons, linking social media accounts, and editing images. The best website builders help with these elements and more, so don’t panic. You can play around with different templates, and get a sense of website customization.
As previously noted, it is important that your site’s design emulate your brand’s colors, niche, vision, and objectives. You can install plugins to expand functionality. Shopping carts and payment processors are great for an e-commerce site while content management and SEO plugins help the online marketing strategy. WordPress alone offers more than 300,000 plugins. To install one, go to the plugin section and click “Add New.” Use the search function to find the preferred plugins and click Install. Be sure to read the reviews and only install the best plugins.
How to Add Pages:

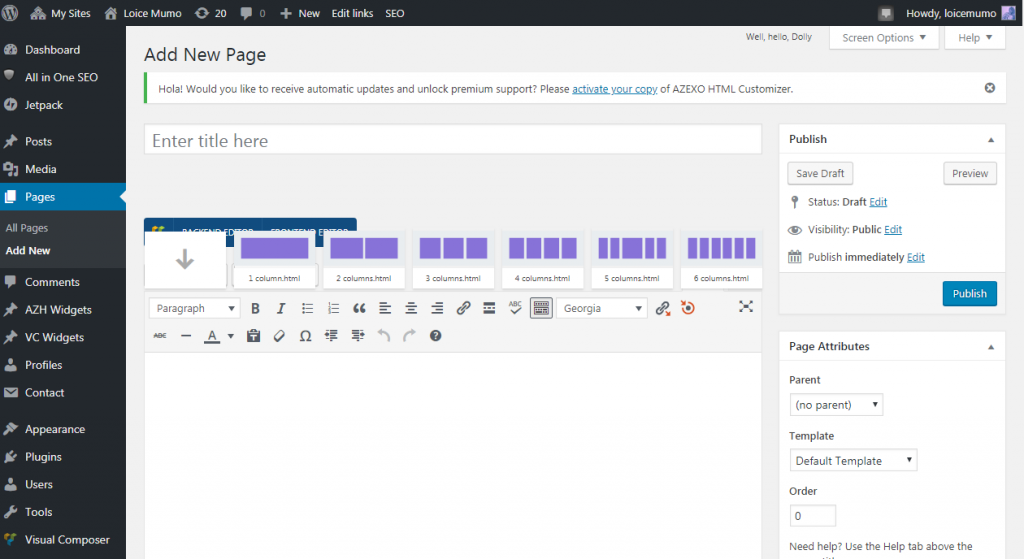
Creating an About Me or Services page is easy. Locate Pages in the WordPress Dashboard (left sidebar) and click Add New. You will be directed to a page that looks a lot like MS. Word. Add text, images, videos and even sections to build the page you want and save when you’re through.
Link a Page to the Navigation Bar:

You can add a page to the navigation menu. Click Appearance on the left sidebar then Menus. Click the checkbox next to the page you created then Add to Menu.
Change Title and Tagline:
Page titles are meant to tell your visitors what a page is all about. Search engines use them to determine SERP rankings. Consider including the targeted keywords in the page title. It should sound natural and be unique. Every page should have a title.
Taglines come at the end of a page title and serve as a brief explanation or extension of that title.
Go to Settings –> General and fill in the form that appears.

These are just a few of the creative options you have when customizing your website. Others include disabling/enabling comments, setting up a static front page, and editing the sidebar.
5. Write and Post Content:
Templates come with demonstrative content that doesn’t reflect who you are as a brand. Don’t publish your site without adding your own content. You don’t just edit the text – images and videos also add a touch of personality. The content should be captivating and relevant to the audience.
Content on the homepage should explain the basics i.e. who are you and what is your site all about? Tell your visitors what you want them to do and this may including browsing the product pages, reading more or get in touch.
Use the About Page to tell your story in a personal but professional voice. You can also talk about your experiences. The idea is to provide a behind-the-scenes of who you are. You can either keep it short or include your firm’s mission, philosophy, and values.
It isn’t always necessary but you can add a Testimonials section and use it to showcase great feedback you receive from customers. Just make sure you get permission from them before sharing their words.
Test Before and After Launch:
Launching your website can be so exciting that you forget to test it before it goes live. And while it may seem overwhelming testing your website is easy. Important factors to consider include;
Design related elements i.e. fonts, images, colors, static front page and more
Network administrator areas including backup system and hosting
Content related materials like punctuation, spelling, and grammar
Search engine optimization details e.g. metadata, titles, tags
Web development items i.e. URLs and broken links
After the website goes live, it’s important that you come up with a maintenance schedule. Important things to consider include preparing the site for promotion, website stat measurement, collecting visitor feedback and backing up the website.
These are very minor tasks, but ones that go a long way towards optimizing user experience.
6. Launch Your Website:
Congratulations – you can now launch your fully functional site. Remember to keep improving it. Update themes and plugins regularly, ensure it has a security certificate and doing whatever you can to keep it functional. You want to keep visitors happy and drum up business, and regular maintenance is crucial to that goal.
Frequently Asked Questions:
Can I create a website for free?
Yes. Most website builders offer free plans and trials. With the free plan, you can create a functional website but you only have limited access to features. The domain also comes in the form of yourname.hostingprovider.com, which has its own challenges. Wix and WordPress offer some of the most comprehensive free plans.
Will my website appear on search engines?
Yes, as long as it is optimized for search engines. Creating a site that ranks well on search results pages requires valuable and actionable content. You also need background knowledge about SEO.
How long does it take to build a site?
Most builders make it easy to create a website within an hour. However, we recommend being patient and taking time to iron out all the details. The time is taken to build a site generally depends on the amount of customization to be done and the number of pages.
Conclusion:
Now that you know how to build a website, go ahead and wow your future visitors. Keep in mind that even after launching it, the work isn’t done. The internet is constantly evolving, and your site needs to keep up. Good luck!
Read Also:
